Summer Holiday Shutdown. We will be closed from 27th of July till 10th of August for Summer Holiday. Orders received during Shutdown will
have 10% Special Discount applied including User discounts if applicable and will be processed from 10th
of August as per our normal LEAD TIMES. Delivery cut off times : Wardrobes/Carcasses - 8th of July; Cut To Size/Edging - 15th of July; Spray Finish - Please Enquire;
Error!
Warning!
The Browser you are using is not fully supported by us. Please use Google Chrome which can be downloaded by clicking this link.
How to fit kitchen base cabinets
Author Chigwell Building & Joinery
Date 08/02/18
Fit kitchen floor units yourself and get great results every time
Preparation
Before you begin, make sure that your floor is even, level and free of dirt, dust and debris. Any material left could mean your kitchen base units do not sit firmly on the floor. Any movement will result in poor finishes and difficultly fitting the countertop correctly.
Most modern kitchen cabinets come with adjustable legs as standard, so if your floor is uneven, you will need to use a spirit level and the adjustable legs to make your units perfectly level. Some kitchen cabinets are built using timber plywood frames without legs. If that is the case, you may need to use shims to prop up appropriate corners of your units to make them level on uneven floors.
Also before proceeding, you may need to check your walls in and around your planned fixing points for internal wall pipes and electrical wires. An electrical cable tracer will find sources of power behind walls. If you are unsure, consult a local professional first. Only proceed with this instructional blog until you are fully satisfied you are safe to do so.
Tools Required
As with any DIY project, you will need the appropriate tools to get the best finish possible, For this task, you will need:
spirit level
spirit level
cable and pipe detectors
electric drill and drill bits
jigsaw or handsaw
circular saw
2 x G-clamps
electric screwdriver or Phillips screwdriver
tape measure
pencil
Marking Up
Assuming your kitchen cabinets are fully assembled, and you have all the brackets and feet for each unit, you are ready to get started.
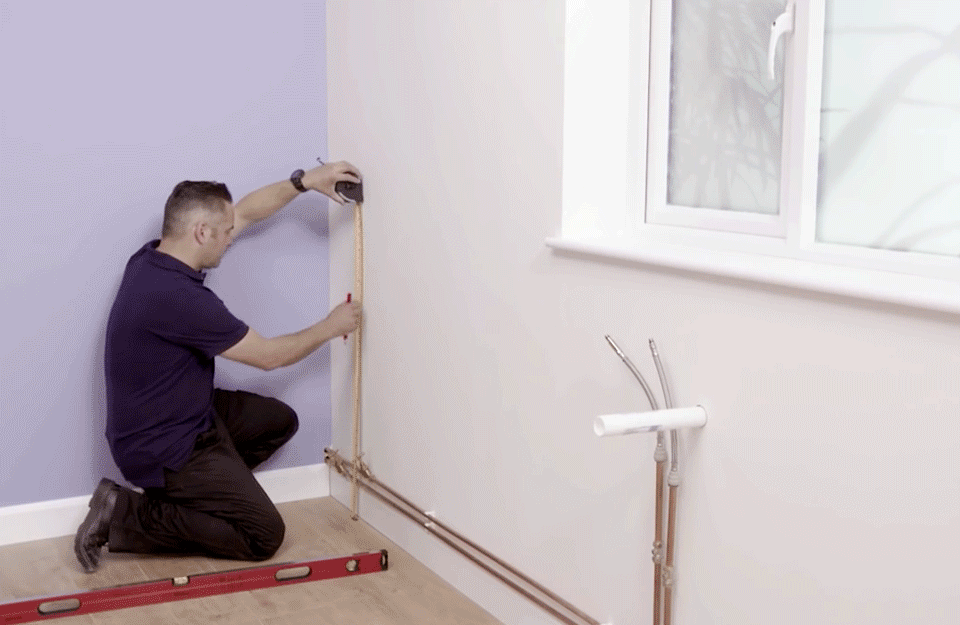
Firstly, you need to mark on the wall exactly where your cabinets will go. It is advised to start the process in one corner and work you way out.
In general, your floor units will sit around 870mm from the floor. With a tape measure, make a mark at 870mm from the floor and using a spirit level, draw a perfectly level horizontal line at 870mm from the floor along the length of the wall where you intend to fit your units. Note that this mark represents the top of the units and does not factor in the additional depth of the countertop to be fitted at a later date.
Now check the height from the floor to your line to ensure the distance does not fall below the 870mm mark. As floors can invariably be uneven, you need to carry this out to ensure your floor units will fit and not sit above that line. If they do, you may need to erase and redraw the line from a point where the floor sits higher. Once the line is correctly marked, you can start to install the units.
Fitting the Units
Starting form a corner, place the unit into its intended position so the back edge is resting against the wall with the pencil mark visible. If pipework is present or skirting board sits above the line of the back of the unit, you will have to cut an access gap on both sides of the cabinet. Simply mark where the pipework or skirting boards pass with a pencil and then remove the unit to allow you to cut the marked area with a jigsaw or handsaw.
Once your cuts are done, place the unit back into position to check it sits above the protruding pipework or skirting board. If so, ensure the unit is level from side-to-side and front-to-back; adjust the feet to the correct height to match the pencil line on the wall and place a spirit level on the top of the unit and adjust until it sits perfectly level. This unit should be fully in place.
Now place the next cabinet into position alongside your first corner unit. Again, check the height is correct using your mark on the wall. Adjust the unit height with the legs and use a spirit level as before. Make sure the heights of the two units sit flush with each other and then clamp adjacent units together with two G-clamps to prevent movement. One at the top, and the other clamp at the bottom.
Attaching Cabinets
To attach the cabinets together and avoid exposed screw-heads, remove any existing hinge-plates from one of the adjacent units. Then drill pilot holes at the top and bottom through to the adjacent cabinet and screw together using the correctly supplied screws. Now reattach the hinge plates to conceal the screws you just used to attach the units together. Now you have two attached units and no exposed screw-heads!
Now you need to attach the units to the facing wall. To do this, attach two L-shaped brackets to the rear left and right top edges of each unit. Then mark where they will be screwed into the wall with a pencil. Temporarily move the units away from the wall to give you enough room to check there are no concealed electrical cables in the wall (with a cable tracer) and then drill pilot holes where you made your marks. Insert appropriate wall plugs or drywall anchors and then move the attached units back into position and screw to the wall through the L-shaped brackets.
Now double check that the attached units are still level and flush to the marked line on the wall. If so, you can move onto the next cabinet and repeat the above processes until all of your floor units are correctly into position and attached accordingly.
Finishing Panels
Once all of your units are in place, you may need to think about fitting side panels to any exposed end units.
Most end panels are supplied larger than your units so you will need to marry up the end panel to you side units and cut off any excess to ensure it fits correctly, removing any overhanging edges that protrudes from the front and the top. Make sure to cut off the end opposite the side that needs to show the panel’s edge banding. For the best cuts, use a circular saw or jigsaw with an appropriate blade to give you clean, splint-free finish.
Remember, you may need to cut the panel around skirting or pipework. To get a flush fit, use a piece of the skirting as a template to get a precise outline of the shape to cut with a jigsaw. Any crude cuts will easily be visible and will make your kitchen look inferior, so always try to make these cuts as accurate as possible. Small gaps however, can be filled with decorators caulk or sealant.
Once your end panel is cut to shape, clamp it to the cabinet, remove the hinge plates, drill pilot holes (making sure not to drill all the way through to the end panel) and screw together with the supplied screws. Replace the hinge plate and finally, remove the clamps.
If you have any other end panels to fit, simply follow the same instructions above. Once completed, your base cabinets should now be fully installed.
See It in Action
If you are still unsure how to follow these instructions, then watch the excellent video below created by Wickes for really helpful instructions on fitting kitchen base cabinets.