Summer Holiday Shutdown. We will be closed from 27th of July till 10th of August for Summer Holiday. Orders received during Shutdown will
have 10% Special Discount applied including User discounts if applicable and will be processed from 10th
of August as per our normal LEAD TIMES. Delivery cut off times : Wardrobes/Carcasses - 8th of July; Cut To Size/Edging - 15th of July; Spray Finish - Please Enquire;
Error!
Warning!
The Browser you are using is not fully supported by us. Please use Google Chrome which can be downloaded by clicking this link.
How to fit kitchen plinths, pelmets & cornices
Author Chigwell Building & Joinery
Date 07/06/18
Give your kitchen the perfect finishing touches
Preparation
Before proceeding, it is assumed that your kitchen floor units and wall cabinets have all been fitted and fully installed and are fixed in their permanent positions. If otherwise, please refer to our previous blog posts explaining how to fit kitchen cabinets correctly. It is also assumed that any flooring has been laid fully and is fitted beneath your kitchen units. Plinths should only be fitted once your floor coverings are in place.
Finally, make sure all surfaces are clean and free from debris such as sawdust, dirt, cement dust, screed or any other contaminants that may affect your final finish. You want to ensure all areas and surfaces are clean before proceeding.
Tools Required
As with any DIY project, you need the best tools to get the best results. For this job, you’ll need:
electric mitre saw (or mitre block and fine toothed handsaw)
jigsaw (with fine toothed blade)
measuring tape
pencil (for marking up)
utility square
electric or Phillips screwdriver
lengths of plinths, pelmets & cornices
plinth brackets and clips
screws
joining blocks
mitre bond
What Goes Where?
Before staring, it is crucial to understand which pieces are suited to various parts of your kitchen units.
The plinths, sometimes referred to as kkckboards, are designed to go underneath your kitchen cabinets where they meet the floor. They are designed to give a nice, neat finished to your cabinets where the floor meets the bottom edges but also to prevent debris and objects from collecting underneath the cabinets.
Pelmets sit at the base of your wall cabinets along the front edge and are considered to be a decorative finish, but also help to hide the underside of your kitchen cabinets which in most cases do not have the same nice finish as the fronts. They are also useful for hiding items such as under-mounted down-lights and cables that may run along the underside of the cabinets.
Lastly, cornices are designed to sit along the front edge at the top of kitchen wall cabinets and are again, considered to be a decorative finished that helps to fill space between the tops of the cabinets and ceiling. They also help to add the illusion of height and in many cases, add a very nice finishing touch to cabinets when installed.
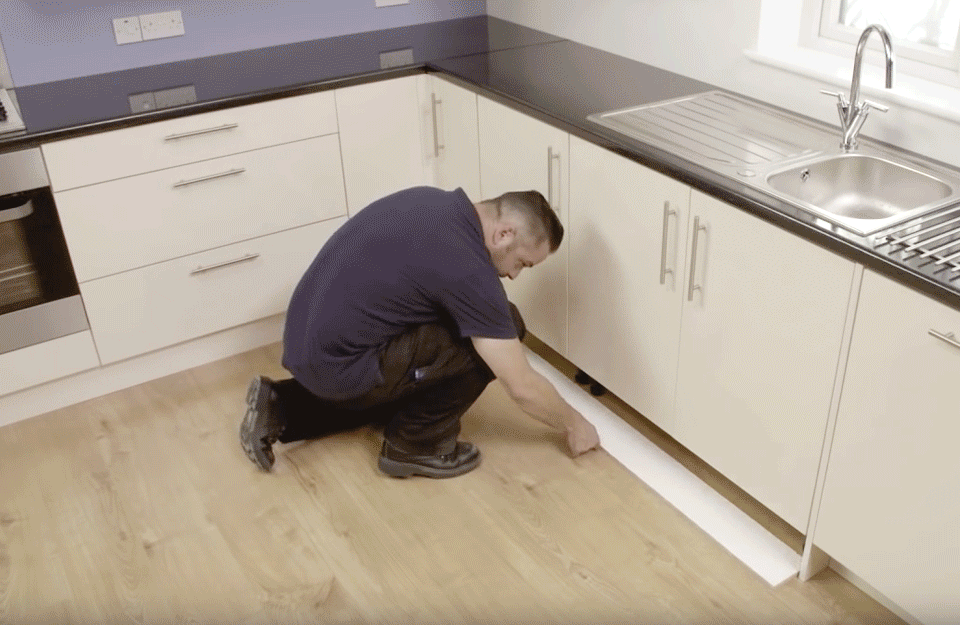
Fitting the Plinths
Plinths are usually supplied in standard lengths of 2.4m - 2.75m so may require cutting to size, depending on the type of kitchen units you have.
If your units have side panels that touch the floor, your plinths will need to sit in between each side panel from one edge of the starting kitchen unit and to the other end of the next. Firstly, measure the gap between each unit side panel and mark the distance on the back of your plinth with a pencil. When marking, use a square to ensure you have a perfectly straight 90º angle before cutting. Now cut the plinth using either an electric mitre saw set at exactly 90º or carefully cut using a fine tooth hand saw.
If the height of your plinths is greater than the gap between your kitchen units and the floor, you may have to trim them lengthways down to an appropriate size. Again, measure the height between your kitchen units and the floor and then make a mark on either side on the rear unfinished side of the plinth and draw a pencil line the full length of the plinth using a straight edge. Using a jigsaw with a fine toothed blade attached, cut the plinth to the desired size.
Once your plinth is correctly cut to size, place your plinth in front of the cabinet feet with the rear unfinished side facing upwards and the cute edge facing towards you. Then, mark the centre position of the feet with a pencil onto the back of the plinth board. Make your marks the full height of the back of the plinth exactly at 90º angles to the feet using a utility square. Once you have your marks in place, screw clip brackets exactly halfway up the plinth and central to the marks you have made. Once in place, slide clips onto each of the the brackets.
Finally, lift plinth into place and gently push the plinth towards the cabinets legs so that the clips pop and grip the legs, holding the plinth into position. Your first plinth should now fitted.
Simply repeat the above process for all your remaining plinths.
Fitting the Pelmets
Like plinths, pelmets are usually supplied at set lengths of around 2.4m long therefore, you may need to cut them down to the correct size.
To start, simply measure from the starting edge of the furthest unit to the next protruding edge on an adjacent unit and mark that length with a pencil on the rear unfinished face of your pelmet. If the first edge is to be a straight cut, make sure the mark you create is 90º true using a utility square, then cut using a fine tooth hand saw or an electric mitre saw set precisely at 90º to your pelmet.
If any of your pelmets are to be fitted to a kitchen unit that sits on an open edge, then you will need to cut mitred edges at an outward 45º angle. For the cleanest, best finish, use an electric mitre saw. However, you can use a fine tooth hand saw and a mitre block, although this does tend to be more fiddly and can lead to uneven mitred edges.
Once your pelmets are all cut to size and are ready to attach to the kitchen units, screw joining blocks to the rear unfinished side of the pelmets at the top of the edge that will touch the underside of the kitchen units. Then position the pelmets flush to the front outside edges of the kitchen units, and screw them to the units on the underside, making sure that any mitred or straight edges are sat precisely where they need to be to create a seamless join with the adjoining pelmet. Apply mitre bond to any mitred edges so that adjoining pieces are sufficiently glued together and show an even, neat edge.
Repeat the above process until all your pelmets are fitted.
Fitting the Cornices
Attaching cornices is practically the same process as fitting pelmets. The only difference is that you are attaching the cornices to the top of your kitchen units. So follow the same practices by accurately measuring your lengths and then make accurate 90º or 45º mitred cuts where appropriate, then screw in joining blocks and then apply mitre bond where necessary.
It’s as simple as that!
See It in Action
If you are still unsure how to follow our guidelines, watch the video below for really helpful instructions on fitting kitchen plinths, pelmets and cornices.