Summer Holiday Shutdown. We will be closed from 27th of July till 10th of August for Summer Holiday. Orders received during Shutdown will
have 10% Special Discount applied including User discounts if applicable and will be processed from 10th
of August as per our normal LEAD TIMES. Delivery cut off times : Wardrobes/Carcasses - 8th of July; Cut To Size/Edging - 15th of July; Spray Finish - Please Enquire;
Error!
Warning!
The Browser you are using is not fully supported by us. Please use Google Chrome which can be downloaded by clicking this link.
Before proceeding, it is assumed that your kitchen floor units are fully installed, are fixed in their permanent positions and have been adequately levelled to prevent any issues with fitting the worktop correctly. If not, please ensure you have sufficiently levelled the floor units and secured them in place before attempting to fit a kitchen worktop.
If you wish to fit a granite, quartz or solid surface material such as corian, this must be carried out by a fully qualified professional who will create an accurate template of your kitchen and prepare the worktop off-site before delivering and fully fitting. This tutorial will only concentrate on cuttable surfaces such as laminate, solid wood or butchers block.
Finally, make sure all of your kitchen floor units are clean and free from debris such as sawdust or any other contaminants that may affect your final finish. You also want to ensure all surfaces are sufficiently prepared, flat and true such as the back walls behind the units, before attaching the worktop.
Tools Required
As with any DIY project, you need the best tools to get the best results. For this job, you’ll need:
kitchen worktop (laminate, wood or butchers block)
worktop joining strips
length of timber baton
2 x G-clamps
circular saw
eye goggles
gloves
measuring tape
utility square
pencil (for marking up)
electric or Phillips screwdriver
sandpaper
hacksaw
electric drill and drillbits
masking tape
scissors
screws
Setting Out
Planning ahead or what professionals refer to as “setting out” is incredibly important, as it will help give you a clear plan of how you will lay your worktop onto the units, where longer lengths of worktop will fit and where adjoining pieces will fit. Where possible, you want to do as little cutting as possible and take advantage of the factory cut edges for adjoining pieces. They will be very square and true and most likely give a neater edge than cutting with a handsaw or electric circular saw. You also want to have as fewer joins as possible so that your worktop looks like one continuous piece.
If for example, you have a U-shaped or L-shaped kitchen, you should use longer pieces of worktop along the longest walls and use smaller pieces for adjoining sections. You want to place joining strips in places that will be least visible and will not spoil the final finish.
Once you have worked out how and where you wish to lay your worktop, you are ready to start.
Measuring & Cutting
Firstly, start with the longest wall and measure the length of worktop you need to fit with one continuous piece from end-to-end. If there are any exposed edges, make sure you compensate for a sufficient overhang over the kitchen unit’s edge, usually at least 20mm and then mark up the kitchen worktop on the underside using a measuring tape, a pencil and a square.
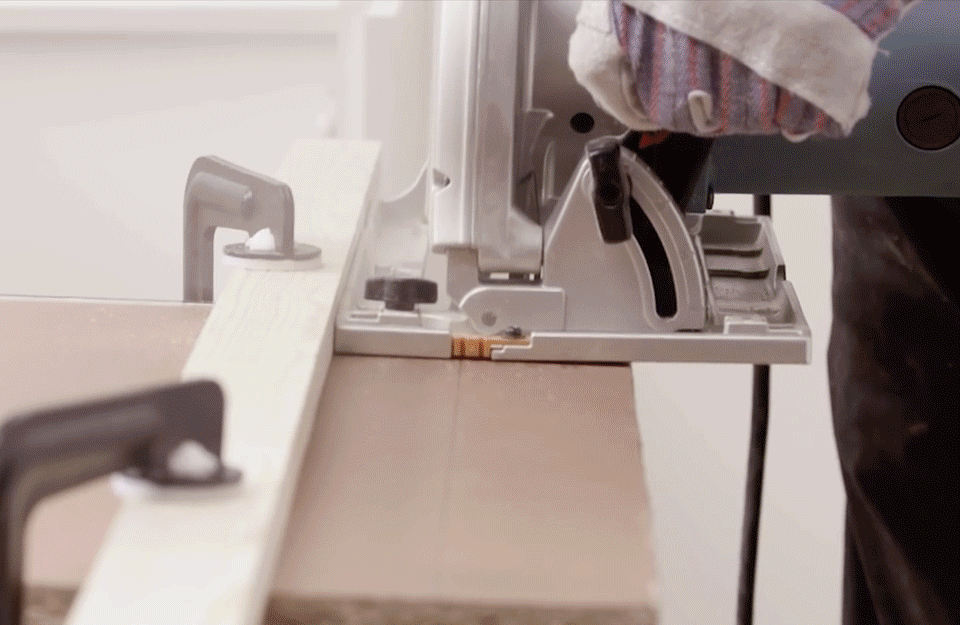
Now with the worktop on a cutting table or saw horse with the underside facing upwards, clamp a piece of timber baton to the worktop as a cutting guide for your circulate saw, so that the blade exactly lines up with the pencil mark you have just made. Make sure that the baton is securely in place and squarely aligned with the pencil marking. The baton will act as a secure cutting guide that your circular saw with press against and ensure the cut is as straight and as clean as possible.
When ready to cut, make sure you wear a pair of protective goggles and gloves. Then cut the worktop with your circular saw in one smooth continuous motion. Do not stop halfway through as this may lead to splintering of the worktop and ruin the final finish.
After cutting, you may need to give the edge a light sandpaper just to remove any nicks or odd edges. Make sure not to sand the visible worktop surfaces and only concentrate on the sides.
Fitting the Worktop
Now lift the cut worktop into position and lay it on top of the base units precisely where you intend to fit it. Push it correctly into position and check that the back is firmly pressed against the rear wall, the overhang at the front is even and any side overhangs are correct. Once satisfied, use a couple of G-clamps to hold the worktop firmly to the units below ready for attaching.
Some suppliers use L-Brackets whilst others require you to drill through the underneath of your units into the worktop and screw them together directly. Either way, you will need to use an electric drill to drill pilot holes from your base units into the worktop. Make sure not to drill too far so that you do not pierce the worktop and ruin the surface. Pilot holes only need to be short just to make attaching the units to the worktops easier and quicker.
Once you have drilled your pilot holes through the base cabinets into the worktop, simply screw them together using the supplied screws and a screwdriver. You should connect the worktop at both the front and towards the back of the base units to ensure a firm, snug fit that will not move.
You should now have your first piece of worktop fitted in place.
Repeat the process above for your additional pieces, ensuring that your cuts are neat and compensate for any overhangs. If you are cutting an adjoining piece, you will most likely need to attach a joining strip to the edge to give a neater, flush edge.
Simply measure the length of strip required and cut it to length using a hacksaw. Then attach the joining strip to the required edge of your worktop using the supplied screws and slide into place. Then when you are satisfied the worktop is positioned correctly, attach it to the base units as described above.
Finishing Touches
If you have any exposed cut edges on surfaces such as laminate, you may need to glue a finishing strip to the edge. Finishing strips are usually supplied in lengths that will need to be cut down. So firstly, tape it to the edge of your worktop using some masking tape and draw the shape using a pencil by templating around the edge of the worktop profile. Then cut the end strip with scissors to carefully create a perfect fitting edge.
Use the glue supplied, ensuring the room has sufficient ventilation due to fumes and apply to both the end strip and the worktop edge. Once it has cured and is ready (usually around 15 minutes), press the end strip in place and use some masking tape to hold it in place until the glue has fully set. Once set, remove the masking tape and your end strip should be firmly affixed.
If the end strips show any odds edges that protrude, you can use a light sandpaper to gently file off any rough edges to make the finish as smooth as possible.
You should now be ready to install all of your remaining kitchen worktops by following the above instructions.
See It in Action
If you are still unsure how to follow our guidelines, watch the useful video below by Wickes for really helpful instructions on fitting a laminate or sold wood kitchen worktop:
Before proceeding, it is assumed that your kitchen floor units and wall cabinets have all been fitted and fully installed and are fixed in their permanent positions. If otherwise, please refer to our previous blog posts explaining how to fit kitchen cabinets correctly. It is also assumed that any flooring has been laid fully and is fitted beneath your kitchen units. Plinths should only be fitted once your floor coverings are in place.
Finally, make sure all surfaces are clean and free from debris such as sawdust, dirt, cement dust, screed or any other contaminants that may affect your final finish. You want to ensure all areas and surfaces are clean before proceeding.
Tools Required
As with any DIY project, you need the best tools to get the best results. For this job, you’ll need:
electric mitre saw (or mitre block and fine toothed handsaw)
jigsaw (with fine toothed blade)
measuring tape
pencil (for marking up)
utility square
electric or Phillips screwdriver
lengths of plinths, pelmets & cornices
plinth brackets and clips
screws
joining blocks
mitre bond
What Goes Where?
Before staring, it is crucial to understand which pieces are suited to various parts of your kitchen units.
The plinths, sometimes referred to as kkckboards, are designed to go underneath your kitchen cabinets where they meet the floor. They are designed to give a nice, neat finished to your cabinets where the floor meets the bottom edges but also to prevent debris and objects from collecting underneath the cabinets.
Pelmets sit at the base of your wall cabinets along the front edge and are considered to be a decorative finish, but also help to hide the underside of your kitchen cabinets which in most cases do not have the same nice finish as the fronts. They are also useful for hiding items such as under-mounted down-lights and cables that may run along the underside of the cabinets.
Lastly, cornices are designed to sit along the front edge at the top of kitchen wall cabinets and are again, considered to be a decorative finished that helps to fill space between the tops of the cabinets and ceiling. They also help to add the illusion of height and in many cases, add a very nice finishing touch to cabinets when installed.
Fitting the Plinths
Plinths are usually supplied in standard lengths of 2.4m - 2.75m so may require cutting to size, depending on the type of kitchen units you have.
If your units have side panels that touch the floor, your plinths will need to sit in between each side panel from one edge of the starting kitchen unit and to the other end of the next. Firstly, measure the gap between each unit side panel and mark the distance on the back of your plinth with a pencil. When marking, use a square to ensure you have a perfectly straight 90º angle before cutting. Now cut the plinth using either an electric mitre saw set at exactly 90º or carefully cut using a fine tooth hand saw.
If the height of your plinths is greater than the gap between your kitchen units and the floor, you may have to trim them lengthways down to an appropriate size. Again, measure the height between your kitchen units and the floor and then make a mark on either side on the rear unfinished side of the plinth and draw a pencil line the full length of the plinth using a straight edge. Using a jigsaw with a fine toothed blade attached, cut the plinth to the desired size.
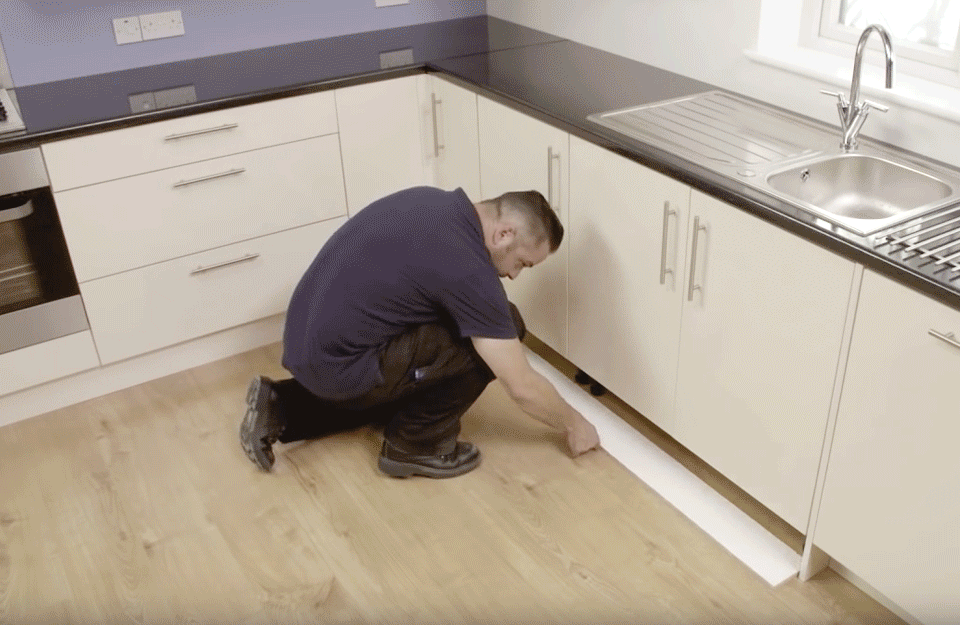
Once your plinth is correctly cut to size, place your plinth in front of the cabinet feet with the rear unfinished side facing upwards and the cute edge facing towards you. Then, mark the centre position of the feet with a pencil onto the back of the plinth board. Make your marks the full height of the back of the plinth exactly at 90º angles to the feet using a utility square. Once you have your marks in place, screw clip brackets exactly halfway up the plinth and central to the marks you have made. Once in place, slide clips onto each of the the brackets.
Finally, lift plinth into place and gently push the plinth towards the cabinets legs so that the clips pop and grip the legs, holding the plinth into position. Your first plinth should now fitted.
Simply repeat the above process for all your remaining plinths.
Fitting the Pelmets
Like plinths, pelmets are usually supplied at set lengths of around 2.4m long therefore, you may need to cut them down to the correct size.
To start, simply measure from the starting edge of the furthest unit to the next protruding edge on an adjacent unit and mark that length with a pencil on the rear unfinished face of your pelmet. If the first edge is to be a straight cut, make sure the mark you create is 90º true using a utility square, then cut using a fine tooth hand saw or an electric mitre saw set precisely at 90º to your pelmet.
If any of your pelmets are to be fitted to a kitchen unit that sits on an open edge, then you will need to cut mitred edges at an outward 45º angle. For the cleanest, best finish, use an electric mitre saw. However, you can use a fine tooth hand saw and a mitre block, although this does tend to be more fiddly and can lead to uneven mitred edges.
Once your pelmets are all cut to size and are ready to attach to the kitchen units, screw joining blocks to the rear unfinished side of the pelmets at the top of the edge that will touch the underside of the kitchen units. Then position the pelmets flush to the front outside edges of the kitchen units, and screw them to the units on the underside, making sure that any mitred or straight edges are sat precisely where they need to be to create a seamless join with the adjoining pelmet. Apply mitre bond to any mitred edges so that adjoining pieces are sufficiently glued together and show an even, neat edge.
Repeat the above process until all your pelmets are fitted.
Fitting the Cornices
Attaching cornices is practically the same process as fitting pelmets. The only difference is that you are attaching the cornices to the top of your kitchen units. So follow the same practices by accurately measuring your lengths and then make accurate 90º or 45º mitred cuts where appropriate, then screw in joining blocks and then apply mitre bond where necessary.
It’s as simple as that!
See It in Action
If you are still unsure how to follow our guidelines, watch the video below for really helpful instructions on fitting kitchen plinths, pelmets and cornices.
Attach kitchen doors handles yourself and get great results
Preparation
Before proceeding, make sure your doors are already correctly fitted to your kitchen units and have been suitably adjusted so that they sit level and true. Also ensure that the surfaces of the doors are clean and from debris, dirt or dust to prevent any damage or errors during fitting your handles. Door handles are usually fitted when the doors are attached to the units so you can use your eye to get a better idea of where you want your handles to be attached.
Tools Required
As with all DIY projects, you’ll need the right tools to get the best possible finish. For this job, you’ll need:
measuring tape
pencil (for marking up)
small spirit level
G-clamp
electric drill and drill bits
electric or Phillips screwdriver
off-cut of wood
door handles and screws
Measuring Up
Assuming your kitchen base cabinets are fully assembled with the doors attached, you’re ready to get started.
As there are various types of door handles available, the placement of your handles may differ. As a general rule, handles will sit centrally width-wise on horizontal drawers, pull outs and cupboards, whilst on traditional floor cupboards, the handles will sit vertically and placed closer to the top corner on the side that opens or near the bottom on floor cabinets on the side that opens. If you’re unsure, check the manufacturers instructions that came with your door handles.
In general, the most common type of handle found in kitchens is the “D-handle” type, which consists of two screws placed at either end of the handle. For this exercise, we will show you how to fit this popular handle type.
To measure up on a regular vertically set cupboard door or pullout, firstly find the correct side where you wish to fit your handles. In general, a floor cupboard will have the handle sat close to the top of the door so that it is easily reached when standing. A wall cabinet however will generally have the handle sat close to the bottom of the door so it is easily reached.
Now you need to decide where you want your handles to be placed. There’s no right or wrong answer to this question as different people have different preferences but always ensure you leave adequate space at both edges where the handle will sit. You do not want your handles too close to edges as they may rub against other surfaces or simply look bad. If for example you are fitting handles to a shaker unit, it is generally accepted that your handles should sit exactly in the middle of both the left and right edges of the raised outer frame to give an even, balanced finished. If your kitchen doors are flat with no framed or beveled edges, it is recommended that your handles are no less than 40mm away from each edge. Any close and the finished look may not be very appealing.
To fit your first handle, measure the exact space between each screw hole on your door handles using a tape measure. Note the distance down on paper in millimetres for later use. Now hold the handle on your door where you feel you would like it to sit, baring in mind to allow sufficient space from each door edge. Now with a pencil, clearly mark the position of first hole you wish to drill with a pencil.
Now take a small spirit level and draw a perfectly vertical line from the middle of the hole you just marked, to approximately the same length as your door handle. And then measure the exact distance from the first hole marked to mark the second hole that matches the distance between the holes on your door handle along the line drawn. You should now have two marks ready to drill before attaching your first handle.
Marking up door handles for horizontal drawers and pull-outs uses exactly the same processes except your handles need to sit precisely in the middle of the doors width. So before marking any holes, find the exact centre of your door by measuring from each edge and mark where the middle of your door is. Then use that mark to draw a horizontal line with a spirit level on your door and mark where the holes on your handles should be along the line.
Drilling Holes & Attaching Handles
Before you begin drilling, always place an off-cut of wood at the back of the door, on the opposite face you intend to drill. Hold it tightly to the door using a G-clamp. The block of wood is there to stop the door from splintering or splitting when the drill reaches the other site. This will ensure clean drill holes every time.
Once you have clamped a block of wood to the opposite face, attach a wood drill bit to your drill that is slightly wider than the screws supplied with your door handles. Begin drilling using the marks you created and drill all the way through the doors. Then repeat the above process for each hole until finished.
Now, with a Philips screwdriver, attach the handles by pushing the screws through your newly drilled holes and tighten until snug. Do not over-tighten as you may damage the door surface.
Your first handle should now be attached.
Templating
Assuming you’re happy with the position of your first door handle, you may want to consider creating a template so that you can copy the precise position of the screw holes and carry that through to all your other doors.
There’s various ways to do this. You could use a good quality piece of cardboard and mark the position of the holes by removing the newly fitted handle and then using a pencil to mark the hole positions drilled. Then will a nail, pop two holes through the cardboard so that you can use the holes to mark other doors.
Or if you prefer, you could remove your newly fitted door handle and note down the precise dimensions from the top and side edges where your holes are drilled and copy this across to other units. Just ensure your holes are precise and level and alway double check your measurements agains your door handles and use a spirit level and tape measure every time. Once you’ve fitted a few door handles, the process becomes much easier and quicker.
See It in Action
If you are still unsure how to follow our guidelines, watch the excellent video below created by Wickes, for really helpful instructions on fitting kitchen wall cabinets.
Install a kitchen island yourself and transform the look of your home
Preparation
Before proceeding, make sure your floors are correctly prepared, are flat and free of debris or imperfections that may cause the kitchen units to sit unevenly or insecurely. Loose or creaking floorboards should be appropriately repaired and all concrete floors should be levelled as necessary.
Also check that no electrical cables or pipes run directly below where you intend to place your kitchen island, as drilling is necessary to fix your units to the floor therefore, you want to ensure you eliminate the chances of drilling or piercing any cables or pipes below.
Tools Required
As with any DIY project, you will need the appropriate tools to get the best finish possible, For this job, you’ll need:
spirit level
G-clamps
electric drill and drill bits
electric screwdriver or Phillips screwdriver
duct tape
screws
L-brackets
Measuring Up
Assuming your kitchen base cabinets are fully assembled, work out the size and placement of your kitchen island in relation to the existing units. Most people like their island to sit adjacent to the kitchen units running along the longest wall, in a place that is convenient to the cooking and food preparation areas that offer plenty of room to move around. A gap of at least 1200mm is recommended on all sides to prevent the space between your units and the island being too cramped. Anything less and you might find your kitchen feels too small and awkward.
If however you’re confident that you have plenty of room to fit an island, then you are ready to get started.
Fitting the Island
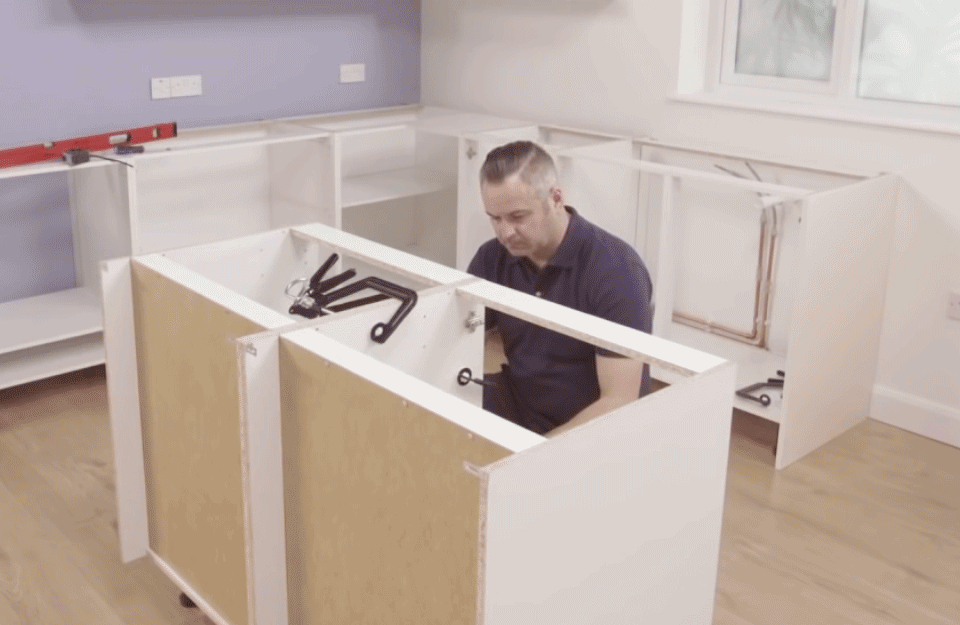
Most kitchen islands are built using at least two kitchen base cabinets. You may use as many as you like to make your kitchen island as big as desired. But for the purpose of this tutorial, we will use just two units to keep things simple.
Firstly, place the two floor cabinets together where you want your kitchen island to be located. Then make sure they are level by placing a long spirit level across the top of the units and adjust the feet until you have them perfectly level where they stand. Once you’re satisfied they’re level, using a couple of G-clamps, clamp the two units to hold them firmly together so you can begin screwing them together as one permanent pairing.
To attach the two units together neatly, you can hide the screws by firstly removing the hinge plates. Once the hinge plate is removed, drill a pilot hold through one side of the unit to the other, ensuring you do not drill all the way through. Then attach the units together by inserting a screw and tighten with a Philips screwdriver. Reattach the hinge plate and then repeat this process with the other hinge plate.
It’s also recommended to attach the cabinets together towards the back as well to ensure strength and rigidity front to back. If suitable pre-drilled pilot holes do not already exist, drill a pilot hole at the back of the unit and attach a screw to hold the two units together. Your two units should now be firmly attached to each other.
Building the Outer Shell
Most kitchen islands have an outer shell to cover the back and side panels of the kitchen base units, giving them a professional finish. Usually, side panels and back panels are used to create a seamless, tidy finish.
Firstly, work out where you’ll attached your end panels to the floor by laying them out next to the cabinets. Then attach two L-shaped brackets to the base of the end panels, ensuring they are not positioned where they will be obstructed by the legs on the cabinet. Then rest your end panel into position where you want it fitted and attach it temporarily to the two kitchen base cabinets using a G-clamp. Repeat this process for the other side panel and then finally, place the back panel in between the two clamped side panels, ensuring all of the end panels have L-shaped brackets attached as necessary. Once you’re satisfied the panels are all neatly in position, grab some duct tape and stick them all together in place to prevent any movement.
Now, carefully slide your two kitchen base units away from the side and end panels, making sure not to knock or disturb them and put them out of the way for the time being. Now you should have access to screw your side and back panels to the floor through the previously attached L-brackets. It is recommended that each panel has at least two L-brackets attached to the floor for added strength and stability. The back panel however will most likely need at least four L-brackets screwed to the floor.
Finishing Up
Once your side panels are firmly affixed to the floor, carefully slide your two attached kitchen base cabinets back into the outer shell you have just attached to the floor and clamp together when in the correct position. Attach the cabinets to the rear of the shell, again using screws through L-brackets so that you create a single rigid frame.
To attach the cabinets to the side panels, drill pilot holes through the side of the kitchen cabinets from the inside, being careful not to drill all the way through. Then screw the cabinets to the side panel using screws.
Your kitchen island should now be in place ready to cut and attach the plinth as well as the doors, handles and kitchen worktop.
See It in Action
If you are still unsure how to follow these instructions, then watch the excellent video below created by Wickes for really helpful instructions on fitting kitchen wall cabinets.
Install kitchen wall units yourself and get professional results every time
Preparation
Before you begin, make sure the wall is appropriately prepared and is smooth, clean and free from imperfections that may hinder the wall cabinets from sitting flush to the wall. Any bumps or lumps could result in poor finishing and difficultly fitting each cabinet accurately and flush to each other.
Also check to see which type of wall you have. A masonry (brick based) wall can be drilled straight into with wall plugs and cabinets hung easily. If you have a stud wall, you may need to locate the position of each of the timber studs to screw in the appropriate fixings directly or alternatively, use drywall anchors designed to take the weight of wall cabinets into the plasterboard.
Finally before starting, it is strongly advised to check your walls in and around your planned fixing points for internal plumbing pipes and electrical wires. By using an electrical cable tracer, you can identify where sources of power are behind your walls and mark them before drilling. If you are unsure, always consult a qualified professional first. Only proceed with this instructional blog until you are fully satisfied you are safe to do so.
Tools Required
As with any DIY project, you will need the appropriate tools to get the best finish possible, For this task, you will need:
step ladder
spirit level
cable and pipe detector
electric drill and drill bits
electric screwdriver or Phillips screwdriver
safety glasses
wall plug (or anchors)
screws
tape measure
pencil
Marking Up
Assuming your kitchen cabinets are fully assembled and your base cabinets are already in place, you’re ready to get started. If you haven’t installed your base cabinets yet however, please fit them first.
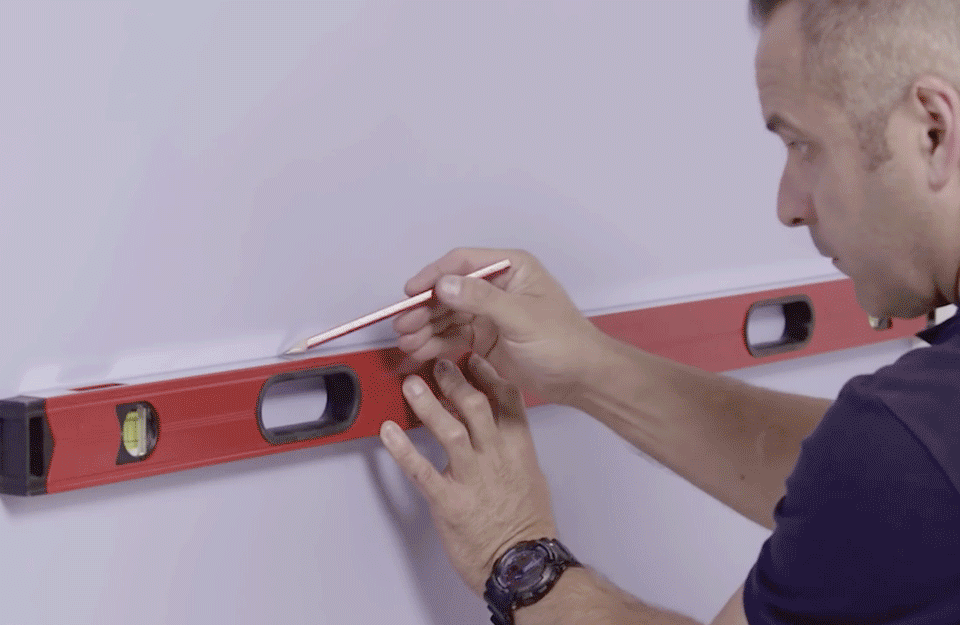
When hanging wall cabinets, it is advised to start with a corner unit and work you way out. So firstly, using a tape measure and pencil mark, on the wall where you want your first cabinet to hang. Wall units usually hang between 450-500mm from the base cabinet worktop, so ensure you allow for sufficient room when deciding where to hang them.
If however you have any full height larder and tall units already installed, the top of that unit should determine how your remaining wall cabinets must hang as you will want the tops of the wall units to sit precisely flush with the top of the full-height larder unit. If you have a larder unit to install but haven’t already fitted it, you must fit this unit firstly before hanging any wall cabinets.
Once you know precisely where you want your wall cabinets to hang, mark horizontal lines for the top and bottom edges along the wall using a spirit level to ensure the lines are straight and level. Then mark vertical lines to clearly define where each wall cabinet will end. This will give you an accurate outline of where your units will sit and will make fitting far easier.
Fitting the Units
Firstly check the rear of the wall cabinet to see how they will hang onto the walls. Usually, there are hooks at either side at the top of cabinet’s back panel. These hook onto plates that are screwed to the walls.
Now, hold a hanging plate up to the rear hook and measure the distance from the top of the cabinet to the base of the hanging plate using a tape measure. Now do the same from the sides of the cabinet to the near edge of the plate, making a note of the measurements. Then mark these exact measurements on the wall in pencil, so you know exactly where the plates should sit on the wall to hang the cabinet.
Whilst holding the plate on the wall where you marked it’s position, mark the screw holes with a pencil. Now before you drill the marked holes, double check there’s no electrical cables or pipes behind the wall using your cable detector. Once you’re satisfied it’s safe to do so, put on your safety glasses and drill appropriate holes using an electric drill and correctly sized drill bit to suit the wall plugs.
Masonry walls will require a masonry drill bit whilst stud walls will require a wood drill bit.
Once drilled, pop appropriate wall plugs into the holes and screw the wall plates into place.
Attaching Cabinets
To attach the wall cabinets, simply lift into place ensuring the rear hooks sit onto the wall plates you just fitted. Start by lifting the unit above the hooks and slowly lower it until the hooks meet. If the cabinet is particularly big or heavy, ask a friend for help.
Now make sure the cabinet sits level by placing a small spirit level on the top of the unit. If your wall cabinet is slightly out, don’t worry. The adjuster blocks inside the back at the top of your cabinets allow you to adjust the cabinet using a Philips screwdriver. Just a few turns and you should be able to get the unit perfectly level!
Once your unit is level, it’s fitted and ready for use. Simply repeat the above instructions to fit the remaining wall cabinets.
Finishing Up
Once all of your wall units are in place, it may be a good idea to screw them to each other to ensure they sit tight and flush to each other. This will also add strength and make them more rigid.
To avoid showing exposed screw heads however, you will want to screw them together underneath the hinge plates. To do so, remove any existing hinge-plates from one of the adjacent wall cabinet. Then drill pilot holes at the top and bottom through to the adjacent cabinet and screw together using appropriately sized screws. Then reattach the hinge plates to conceal the screws you just used to attach the units together.
Repeat for all of the wall cabinets, ensuring their top and bottom edges all sit flush before screwing together.
Your kitchen wall cabinets are now fully installed and ready for use!
See It in Action
If you are still unsure how to follow these instructions, then watch the excellent video below created by Wickes for really helpful instructions on fitting kitchen wall cabinets.